Using Outlook synchronization
The first step in using Outlook synchronization is to establish the association between a contact list or calendar in BSCW and the corresponding contact folder or calendar in Outlook on your local computer.
• Open the contact list or calendar which you want to synchronize with a local Outlook folder.
•
Select
in the top menu or click on  in the action shortcut bar to
start the synchronization applet.
in the action shortcut bar to
start the synchronization applet.
• After start-up, the applet will show a separate window in which you may select an Outlook folder to associate with the current contact list or calendar for synchronization purposes. You may either select an existing Outlook folder or create a new empty one. You create a new folder by first selecting an existing folder as parent folder, then entering the name of the new folder and finally hitting [Create Folder].
Note: The Outlook synchronization has been designed to access the Outlook application in a desktop environment; you cannot use it to access a MS Exchange Server. Consequently, you need to select here a contact list or a calendar from a local Outlook Personal Store (PST).
The folder selection window will only come up when there is no Outlook folder associated with the current BSCW contact list or calendar. This is the case when Outlook synchronization is first started for a contact list or calendar or when the associated Outlook folder is not accessible, e.g. has been deleted meanwhile.
The association between a BSCW contact list or calendar and an Outlook folder is valid for the lifetime of the associated objects, i.e. until the BSCW object or the Outlook folder is destroyed (in Outlook: deleted from the Deleted Items folder).
Note: Although it is possible to associate two BSCW contact lists or calendars with the same Outlook folder, we strongly discourage you to do this. Subsequent synchronization will lead to two different BSCW contact lists or calendars with the same contents which might be disturbing and may lead to unnecessary conflicts.
During the initial synchronization, contacts and appointments of the BSCW contact list or calendar will be downloaded to the associated Outlook folder, while the contacts or appointments of the Outlook folder, if any, are uploaded to the corresponding BSCW object. The corresponding actions are indicated in the main window of the synchronization applet (see the figure below). As a result, the associated objects on both sides contain the same contacts or appointments.
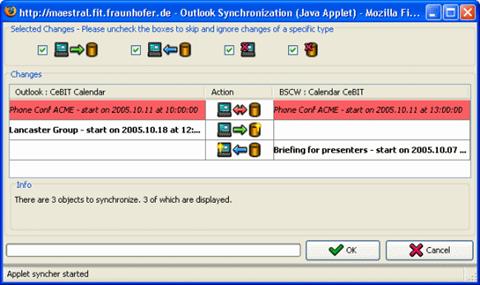
Figure 31: Main window of the Outlook synchronization applet
Important: You should consider the following points when synchronizing appointments:
o Set your personal time zone via in the ‘Time Zone’ section. This ensures that “floating” appointments, i.e. BSCW appointments with no time zone set (the default), are transferred correctly to your associated Outlook calendar.
o Outlook supports less sophisticated recurrence rules for appointments than does BSCW. Consequently, only BSCW appointments with one recurrence rule and no exception rules can be transferred to Outlook during synchronization. There are further restrictions on the recurrence rules that may be transferred to Outlook; you will be advised via according error messages. To be on the safe side, have a look at the recurrence patterns that are possible in Outlook.
o Modifications of individual appointments belonging to a whole series of recurring appointments cannot be transferred from one side to the other during synchronization.
Further kinds of actions may become necessary during the synchronizations following the initial one: contacts or appointments may have been modified or deleted and more contacts or appointments may have been added on one side or both. Consequently, contacts or appointments may need to be updated, deleted or created on one side or the other. The necessary synchronization actions are listed in the main window of the synchronization applet as shown in the figure above.
The synchronization actions are distinguished using specific icons.
 A new
contact or appointment has been created in Outlook; a corresponding object is to
be created in BSCW via transfer of the object from Outlook to BSCW.
A new
contact or appointment has been created in Outlook; a corresponding object is to
be created in BSCW via transfer of the object from Outlook to BSCW.
 An
existing contact or appointment has been modified in Outlook; the
corresponding object in BSCW is to be updated via transfer of the
object from Outlook to BSCW.
An
existing contact or appointment has been modified in Outlook; the
corresponding object in BSCW is to be updated via transfer of the
object from Outlook to BSCW.
 A
new contact or appointment has been created in BSCW; a corresponding object
is to be created in Outlook via transfer of the object from BSCW to Outlook.
A
new contact or appointment has been created in BSCW; a corresponding object
is to be created in Outlook via transfer of the object from BSCW to Outlook.
 An
existing contact or appointment has been modified in BSCW; the
corresponding object in Outlook is to be updated via transfer of the
object from BSCW to Outlook.
An
existing contact or appointment has been modified in BSCW; the
corresponding object in Outlook is to be updated via transfer of the
object from BSCW to Outlook.
 An existing contact
or appointment has been deleted in Outlook; the corresponding object in
BSCW is also to be deleted.
An existing contact
or appointment has been deleted in Outlook; the corresponding object in
BSCW is also to be deleted.
 An
existing contact or appointment has been deleted in BSCW; the corresponding
object in Outlook is also to be deleted. Note that concurrent deletion of
two corresponding contacts or appointments is not specifically
indicated because no synchronizing action is necessary in this situation.
An
existing contact or appointment has been deleted in BSCW; the corresponding
object in Outlook is also to be deleted. Note that concurrent deletion of
two corresponding contacts or appointments is not specifically
indicated because no synchronizing action is necessary in this situation.
 An existing contact or
appointment has been modified in both BSCW and Outlook; the resulting
conflict is to be resolved manually by giving priority to one of the
modifications.
An existing contact or
appointment has been modified in both BSCW and Outlook; the resulting
conflict is to be resolved manually by giving priority to one of the
modifications.
 An
appointment cannot be transferred from one side to the other. The reason for the
transfer problem is displayed in the lower part of the applet window
when the specific item is clicked on. In most cases, transfer problems are
caused by complex recurrence rules of BSCW appointments or changes in
individual appointments belonging to a series of recurring appointments,
both of which is not supported by the synchronization process.
An
appointment cannot be transferred from one side to the other. The reason for the
transfer problem is displayed in the lower part of the applet window
when the specific item is clicked on. In most cases, transfer problems are
caused by complex recurrence rules of BSCW appointments or changes in
individual appointments belonging to a series of recurring appointments,
both of which is not supported by the synchronization process.
Transfer problems have to be handled manually outside the synchronization process, e.g. by simplifying a complex BSCW recurrence rule or by undoing a modification of an individual appointment belonging to a series of recurring appointments in Outlook.
The other situation that cannot be handled automatically during synchronization is the conflict. Concurrent modifications of two corresponding contacts or appointments since the last synchronization constitute a conflict. The nature of the modifications is not taken into account, only the point in time when the modifications were carried out. Also, modification of an object on the one side and deletion of the corresponding object on the other side is regarded as a conflict. Consequently, conflicts may not be resolved by deleting the object concerned on one side or the other. Also, undoing the modification on one side or the other will not work because this would be regarded as an additional modification again. Conflicts may only be resolved by giving priority to one of the modifications and having the object on the other side updated accordingly. Of course, no one will force you to resolve a conflict or to remove a transfer problem, you will only be remembered that there are problems, every time you do an Outlook synchronization.
You have several possibilities to control the synchronization process:
• In the upper part of the applet window, you may select certain groups of synchronization actions for display in the main list by checking or unchecking the respective check boxes. Actions that are not displayed in the main list will not be executed during synchronization. This way, e.g., you may forbid the deletion of contacts in your Outlook folder.
• You
may individually determine the synchronization action to be taken for the items
in the main list of the applet window. Clicking on the action icon of an item
will display a drop-down menu with the actions possible, from which you may
select the action to be executed for this item. This is particular useful
for the manual resolution of conflicts or the exemption of individual items
from the synchronization by selecting the null action for these items, which is
symbolized by the  icon.
icon.
• You
may also set the synchronization action for a whole group of items that you have
selected manually in the main list by clicking on the items. After selection of
the items, a right-mouse click will display a pop-up menu with the actions
possible for all items in the group. This is particular useful for resolving a
whole group of conflicts in the same manner. Attention: If your selection of
items is too heterogeneous, the null action () may be the only action permissible
for all items in the selection.
After you have decided which objects to synchronize and how, you finally start the actual synchronization by hitting the [OK] button in the synchronization applet window. The progress bar in the lower part of the applet part will inform you about the progress of the synchronization process.
Attention: If
the synchronization process comes to an in-between halt, the reason may be that
you are asked in a separate pop-up dialog to allow the access to Outlook’s
e-mail addresses by the synchronization applet. This is a built-in security
check against virus attacks. To continue the synchronization process you have to
allow the access for the applet. There is a freeware program available that
will do this automatically on your
behalf.
(http://www.contextmagic.com/express-clickyes/)